Color Visualizer
Eric Ma (exm4), Vaishnavi Dhulkhed (vd89), Joy Thean (jct263)
ECE 5725: Embedded OS, Spring 2020, 5/21/2020
Project Demo
Objective
It’s really hard to imagine what a color blind person sees in their daily life, so we built a color visualizer to not only let people without color blindness see how those with these deficiencies view the world but also help people with these deficiencies distinguish colors better. Our goal is that through our project, a color blind person can pass a color blindness test and someone with normal vision can better empathize with people by experiencing sight with all eight types of deficiencies.
Introduction
By shifting the RGB color codes of each video frame in real-time using computer vision, our project simulates looking at the world through filters (Figure 1).
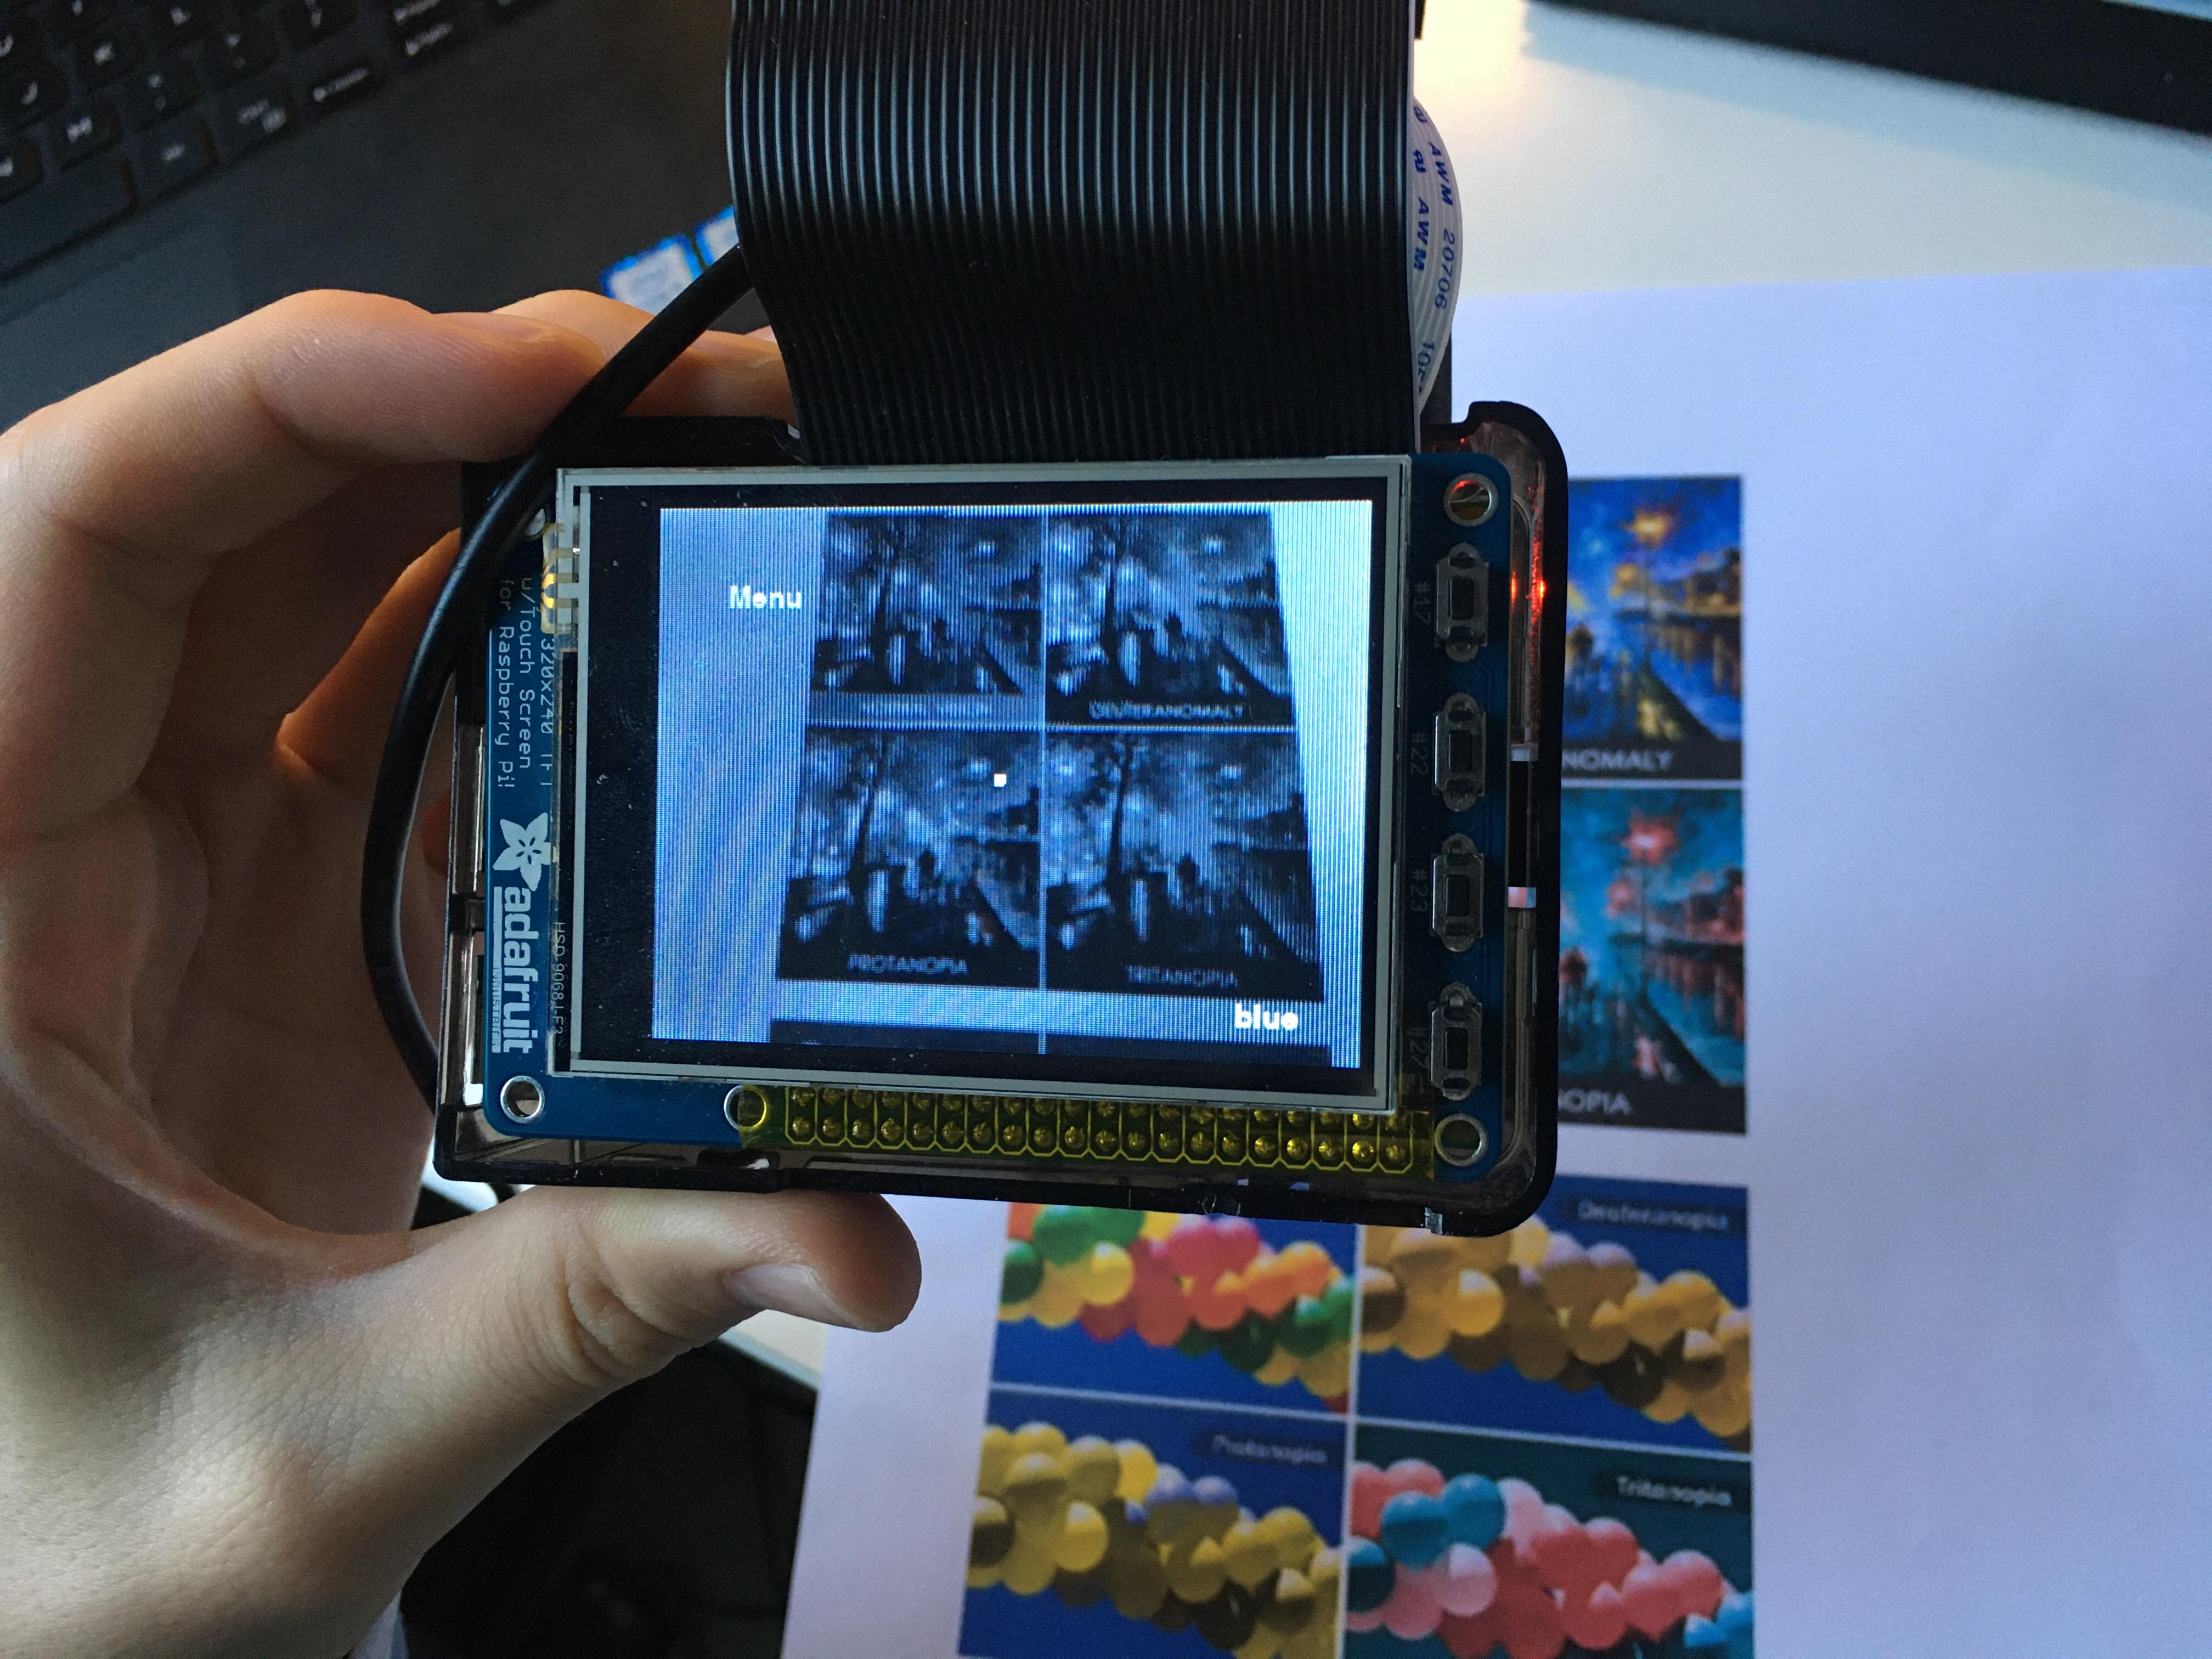
Figure 1. Final System
Although red-green color blindness may be the most familiar and type of color blindness, there are actually eight different types of color blindness:
- Protanomaly: Reds look like green and are less bright.
- Protanopia: Reds and greens have no visible difference.
- Deuteranomaly: Greens look more like red.
- Deuteranopia: Reds and greens have no visible difference.
- Tritanomaly: Blues and greens as well as yellows and reds are hard to distinguish between.
- Tritanopia: Blues and greens, purples and reds, and yellows and pinks are hard to distinguish between. Also, colors look less bright.
- Achromatomaly: Some lack of color in vision.
- Achromatopsia/Monochromacy: Complete lack of color in vision.
- Color Assistant: Real-time video with a choice of eight filters to support color distinguishability for people with color blindness
- Color Simulator: Real-time video with a choice of eight filters to show people without color blindness how their world would look to someone with color blindness
- Original: Real-time video with no filters
Design and Testing
Hardware
The hardware for this project is very simple. We use a PiCamera V2 module to connect to the Raspberry Pi. This uses the PiCamera V2 ribbon cable to connect directly to the Pi, and images are displayed with a 2.8” Touchscreen PiTFT, which attaches directly into the GPIO header pins.

Figure 2. Hardware Schematic
Software
State Machine
All code handling the states, video and user interaction for our system can be found in menu.py. The following diagram in Figure 3 shows the states and transitions in our program.

Figure 3. State Diagram
The original video is the first state shown once the program is launched.
This state displays real-time video captured from the piCamera. Tapping
the Menu button transitions to the Menu state where we implemented three options:
color simulation, color assistant, original video. By choosing color simulation or
color assistant, the program moves into the Types state where we display the eight
types of color blindness as described above. All these buttons transition the
program to the Description state where a unique description is displayed. Along
with the short description, this screen also displays a start button which will
trigger the transition to one of two states: Simulation and Assistant.
In the simulation state, the program will filter the original video as a person
with that type of color blindness would see. In the assistant state, the program
will filter the original video to support color deciphering by someone with the
selected type of color blindness. These states mentioned (except the Original
Video state) also have Back buttons that take the program to the previous state.
All of the above mentioned state transitioning and features were implemented with Pygame.
Pygame allows us to create on screen text and read TFT touchscreen inputs. By detecting
events and checking the coordinates of each tap, we could identify when and where the
user clicked to alert our system which state to transition into next. To identify
a touchscreen input within a certain button pixel, we first designate a pixel area
around text that we display on screen using Pygame. We next detect for a touchscreen
press event and release event, and upon the release event we save the touched
coordinates. If these x,y pixel coordinates fall within the pixel range where
our text is on the screen, we begin to run code to change states based on the
pressed button. Below is an example of the code we use to detect a “menu” button
press from our video streaming states.
if (event is None):
    return

if (event.type is  MOUSEBUTTONDOWN):
    pos = pygame.mouse.get_pos()
elif (event.type is MOUSEBUTTONUP):
	pos = pygame.mouse.get_pos()
    x,y = pos
    #change states when menu button is pressed
    if x < 70:
      if y < 60:
        #Menu button is pressed
During testing, we ran into a few issues with the integration of tap detection, our state machine, and the real-time video. At first, because we were only checking the state of our system and blitting frames when a mouse event occurs, video would only appear when the user was touching the screen. Another state issue we ran into was that every time we updated the current state, our program would wait until the next check of mouse events to act depending on the state previously set. To fix these two issues, we simply ran our state handler outside of tap detection events as well as shown in the below code snippet.
run(None)
for event in pygame.event.get():
	if event.type == pygame.QUIT:
		sys.quit()
	run(event)
Real-Time Video
We use OpenCV to create our videostream and take in data from the PiCamera.
OpenCV receives data in terms of numpy arrays of pixel and color data,
which is optimal for running filters and algorithms. As we already use
Pygame to run our menu system, we also chose to use Pygame to display each
edited frame to the TFT.
To use OpenCV to read camera input to extract images, we used a cv2 VideoCapture,
and read frames from the video capture to process. To initialize our video
capture, we declare a video capture variable, and set the resolution to match
the PiTFT.
feed = cv2.VideoCapture(0)
feed.set(cv2.CAP_PROP_FRAME_WIDTH, 320)
feed.set(cv2.CAP_PROP_FRAME_HEIGHT, 240)
When we are in a state that displays video, we continually read from the video capture, and edit the data values so they properly display on our TFT. We first take in the data using the .read() command, which returns a numpy ndarray of shape 320 x 240 x 3, with each 320 x 240 array containing one set of data of BGR color format. We then rotate and flip the display, so that the image is not inverted. Next we use the CV color commands to convert the BGR data to RGB, which is readable by Pygame. Finally, we convert the nparray to a Pygame surface, which is a data type that allows Pygame to display directly to the TFT. This code will continually run for each frame. The code below shows how we display non-filtered images: with filtered images we call our filtering function based on the given input, create a surface from the returned nparray from the filter.
returnBool, frame = feed.read()
rgbf = cv2.cvtColor(frame, cv2.COLOR_BGR2RGB)
rgbf = cv2.rotate(rgbf, cv2.ROTATE_90_COUNTERCLOCKWISE)
rgbf = cv2.flip(rgbf,1)
# For filtered images, we call our filter functions here
surf = pygame.pixelcopy.make_surface(rgbf)
screen.blit(surf, irect)
One issue we came across is the frame buffering system that CV video captures use. When the videocapture reads frames, it will store the frames in a buffer at the rate of the set fps. Calling feed.read() in the above code will pull the oldest frame in the buffer, as opposed to the most recent. Since the filtering function cannot process frames as fast as the frame rate, a delay begins to form as the buffer increases in number of frames. We originally wanted to use the buffersize cv2.videocapture property, but that property was not supported for the Linux version on the Pi. To combat this, we release the video capture when the user is in a menu state, and re-initialize it when the user enters a displaying state. This reduces unnecessary video capturing while in menus, and will reset the buffer for when the user returns to a display state.
Color Analysis
All color analysis algorithms can be found in filter.py.
To create the various
filters we used for our project, we performed a series of matrix functions on the
numpy arrays extracted via OpenCV. Because the different types of color blindness
all have different color ranges, we had to treat each state and type separately.
For simulation, we created scalar matrices to determine how much each RGB color value needs to be
shifted in order to transition each pixel in the images into the correct color range. Every new
RGB value would take on a specific weighted sum of the original RGB values.
Because each numpy array has shape of 320 x 240 x 3, simply using loops and math
functions was too slow. We achieved a greater efficiency by using numpy array functions
that map across an entire matrix rather than element by element. By reshaping into an
mappable shape and then using einsum, the time it takes to traverse the whole matrix
is cut down by a factor of eight.
flat_rgbf = rgbf.reshape(1, 320*240, 3)[0]
flat_dot = np.einsum(‘ij,kj->ki’, sim, flat_rgbf)
...
new_rgbf = flat_dot.reshape(320, 240, 3)
Figure 4.2 shows a final tritanopia simulation on an image with a variety of colors and shapes with our algorithm.
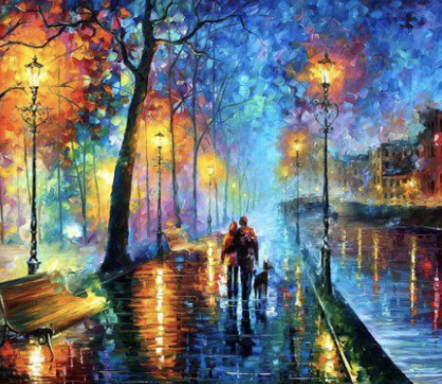
Figure 4.1. Normal Vision
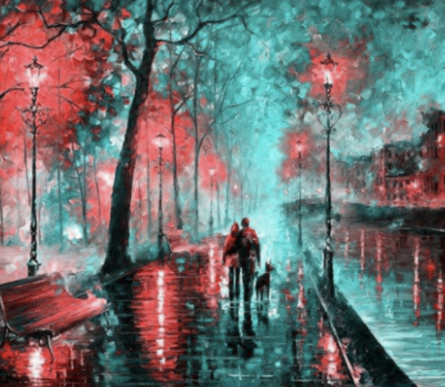
Figure 4.2. Tritanopia Filter
Color assisting was handled very differently based on type. Because the color ranges
for each type are quite different and are not the same for everyone, this part of our
color analysis was very challenging. We tested with various algorithms such as
increasing luminance, increasing contrast, replacing greens with blues, and
increasing/decreasing HSV values. Most of these methods, however, failed because
the difficulty with color blindness is mainly the difference between colors rather
than the individual colors themselves. For example, if we shifted all greens to blue,
then it would be hard to see the difference between greens (that are now blue) and
blues (that were originally blue).
For protanopia, deuteranopia, tritanopia and tritanomaly, we found that increasing
the hue of each RGB pixel in the image created the effect we were looking for. With
this algorithm, all the colors shift into a range that can be better seen by the
person, allowing the various colors to be distinguished. We used the below code to
convert all RGB values in the matrix to HSV, adjust the hue, then convert back to RGB.
HSV = matplotlib.colors.rgb_to_hsv(flat_rgbf)
HSV[:,0] += h
HSV[HSV > 1] -= 1
HSV[HSV < 0] = 0
rgb = matplotlib.colors.hsv_to_rgb(HSV)
From Figure 5.1 and Figure 5.2, you can see that without our filter, someone with protanopia wouldn’t be able to see the “45” at all. With normal vision, the bottom left image (Figure 5.3) looks very out of place, but when someone with protanopia looks at this color assistant filtered image, the “45” is easily readable as shown by the difference between the top right (Figure 5.2) and bottom right (Figure 5.4) images. Similarly with Figures 6.1 - 6.4, the “12” is much more readable to someone with tritanope vision after we apply our filter.

Figure 5.1. Normal Vision

Figure 5.2. Protanope vision with no filters
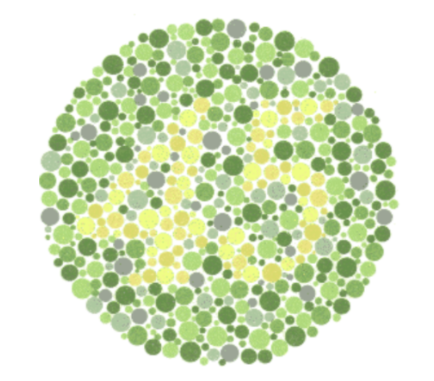
Figure 5.3. Assistant-filtered normal vision
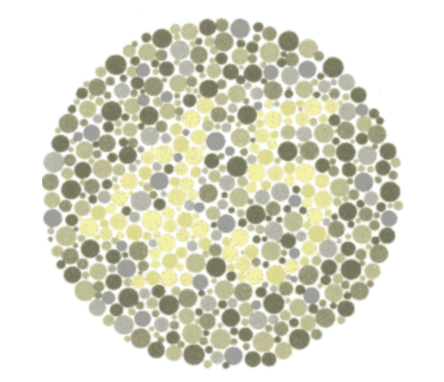
Figure 5.4. Protanope vision with assistant filter
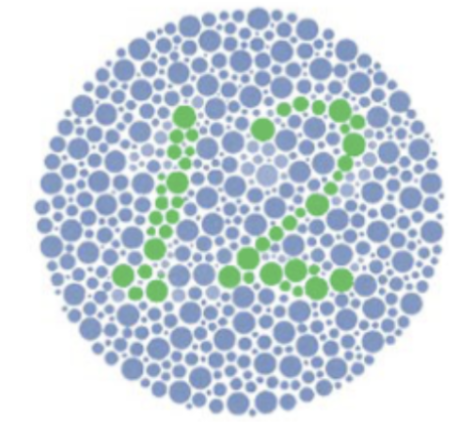
Figure 6.1. Normal Vision
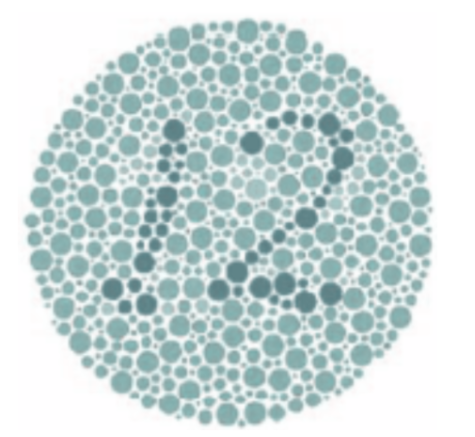
Figure 6.2. Tritanope vision with no filters
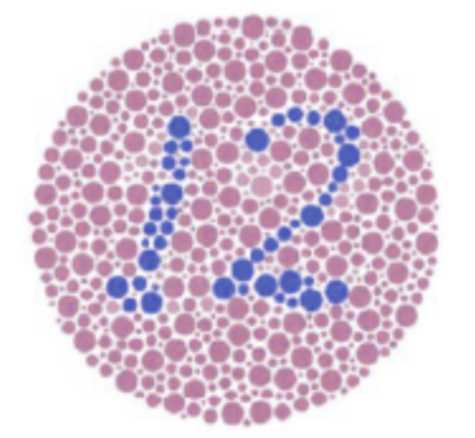
Figure 6.3. Assistant-filtered normal vision
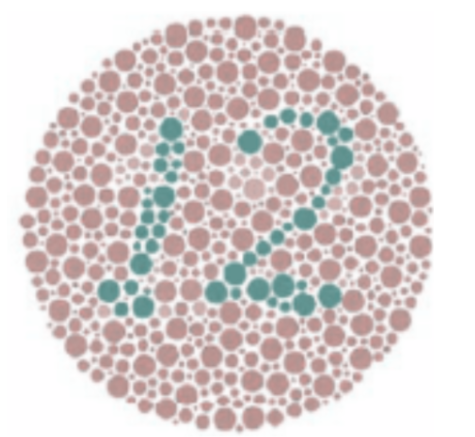
Figure 6.4. Tritanope vision with assistant filter
For protanomaly and deuteranomaly, we couldn’t use the hue-shifting algorithm.
We tested our above filters on someone with protanomaly, and they reported back
that the protanopia color assistant filter was too strong and actually made the
image’s colors less distinguishable. So we used a different algorithm on both:
adding a blue filter. With this method, reds and greens will be able to be
distinguished more easily because of this addition of a color that they can see
and differentiate. To do this, we used scipy and numpy functions as well as a lookup
table referenced from
Python OpenCV: Building Instagram-Like Image Filters.
For monochromacy, however, we didn’t shift any colors. Because monochromacy means a
complete lack of color, applying filters wouldn’t help. Instead, we added a color
identification feature where the piTFT screen displays the name of the color the cursor
(located at the center of the screen) is currently pointing at. In implementing this
feature, we use a combination of numpy functions to average the middle four pixels
as well as lookup tables for the RGB color values and color names. The pseudocode for
identifying is below.
# average RGB pixel array of middle four pixels of image
# subtract average from all color arrays in lookup table
# take absolute value then sum values across columns
# use minimum as index for color names lookup table
After testing on various color wheels and objects, we decided to add this feature into all simulation and assistant states as well since color identification is helpful in all cases where colors are different from their original range (Figure 7).
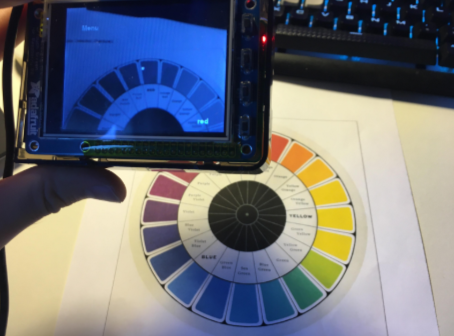
Figure 7. Monochromacy Simulation with Cursor
Results
Our project addresses the problem we targeted and achieves our goal of filtering colors in the shape of a hand-held video camera. We succeeded in simulating each type of color blindness and also assisting people with color blindness to better decipher colors in real-time on the piTFT. We ran into some issues with OpenCV and the color algorithms that required a lot of testing and experimenting along the way, but in the end, all 17 individual modes of our system performed as planned. We even tested on someone with protanomaly and received positive feedback on our filters.
Conclusion
We achieved the following goals:
- Color Simulation: We successfully simulated all 8 types of color blindness by changing the color scales as shown below.
- Color Assistance: We added color assistance to 6 out of the 8 types of color blindness. For monochromacy, we successfully added a cursor to detect colors and display the color’s name on the piTFT.
Overall, we were able to successfully find a solution to the problems we were targeting and by using our color visualizer, one will be able to understand the perspective of a person with color blindness and also pass the color blind test! Below are color ranges that we simulated for each of the eight types of color blindness.

Normal Vision

Protanomaly

Protanopia

Deuteranomaly

Deuteranopia

Tritanomaly

Tritanopia

Achromatomaly

Achromatopsia/Monochromacy
Future Work
If we had more time and resources to work on this project,
we would implement a few changes to create a more cohesive product.
First, we would 3D print or laser cut parts to encase the Raspberry Pi
and create a more user-friendly, video camera look. With our limited
resources away from campus, we were unable to create a hand-held, battery
powered system like we imagined. On campus, we would ideally use a battery
pack to power the Pi, and create a physical on/off switch that could power
on the Raspberry Pi and shut it down safely. We would also create a fully
3D printed or laser cut case, to produce a professional product.
Another hardware upgrade we would make is to change the camera used.
The PiCamera, while being a convenient and compatible hardware module
for the Raspberry Pi, has issues with color in poor lighting environments.
With a more powerful camera, we could be even more accurate with color,
even in suboptimal lighting conditions.
In software, we would look into multi-core processing so that our filtering
could run quickly. Since our screen filtering is independent per pixel, we
could split each image to all cores, and potentially run our programming much
faster, creating a smoother video. Also, we would find software methods to
change the buffer size of the CV video capture, which would fix the delay in
video streaming.
Work Distribution
Meet the Team!
Joy Thean

Vaishnavi Dhulkhed

Eric Ma
Member Bios
Joy is majoring in ECE and minoring in ORIE and CS. She is expected to graduate in Spring 2021. She loved getting close to this team over the course of the class and also seeing so many fun, different ways of integrating interesting systems with the Raspberry Pi. In her free time, she likes to read and watch movies. Linkedin
Vaishnavi is studying ECE and is expected to graduate Spring 2021. She enjoyed working on cool projects on the Raspberry Pi. She also loved working with her team and loved how much she learned. In her free time, Vaish likes to watch Netflix and improve her acting skills. Linkedin
Eric is majoring in ECE with a minor in CS and business, and is expected to graduate in Spring 2021. He enjoyed finding creative ways to film the images shown on the piTFT for the Demo and Video. In his free time, he enjoys playing frisbee with his team and building household electronics for his mom. Linkedin
Work Distribution
Eric Ma worked on video streaming and all physical hardware.
He worked on creating the CV video captures, and how to convert the
video capture to displayable formats for Pygame. As he had the Raspberry Pi,
he also worked on reverse SSH tunneling, and hosting code liveshares.
He also worked on testing the code that was written by the whole team
on the physical Pi.
Vaishnavi Dhulkhed worked on the color correction mechanisms with Joy.
She helped with the color assistance by researching different methods
that can be used and found the HSV scale conversion to be the optimal one
for color assistance. She also worked on debugging the code while it was
tested on the physical Pi. She also worked on the design of the website.
Joy Thean worked on the state machine and color simulations,
as well as the color correction mechanisms with Vaishnavi. She helped
set up the structure for the program states and did research on color
simulation, correction and averaging algorithms for numpy and scipy image
analysis. She also worked on debugging the code.
All sections of this report were written by all three members of the team.
Parts List
| Item | Quantity | Vendor/Link | Price |
|---|---|---|---|
| Raspberry Pi 3B | 1 | ECE Department | $35.00 |
| Pi TFT | 1 |
ECE Department Amazon Link |
$34.70 |
| piCamera | 1 |
ECE Department Adafruit Link |
$29.95 |
| Total Cost | $99.65 |
Appendix
References
| Name | Decription |
|---|---|
| Color Blindness Simulator | Popular tool user to simulate some form of color vision deficiency |
| Color Matrix Library | Examples of the most basic ColorMatrix formulas. |
| Smartphone Based Image Color Correction for Color Blindness | Research paper on color correction algorithms. |
| Python OpenCV: Building Instagram-Like Image Filters | Image transofrmation techniques to obtain image filters using OpenCV. |
| Picamera Documentation | Picamera Documentation |
| PyGame Documentation | PyGame Documentation |
| PyGame Documentation | PyGame Documentation |
| OpenCV VideoCapture Documentation | OpenCV VideoCapture Documentation |
| OpenCV VideoCapture Properties | OpenCV VideoCapture Properties |
| Figure 2: Raspberry Pi Camera Setup | We referred to this website to develop the hardware schematic of Raspberry Pi Camera Setup. |
| Figure 4: Melody of the Night | We used these images as references to test our color filters. |
| Figure 5: Protanopia Test Sample | We used these images as references to test our color filters for Protanopia. |
| Figure 6: Tritanopia Test Sample | We used these images as references to test our color filters for Tritanopia. |
| Figure 7: Color Wheel | We used this color wheel as reference to test the cursor. |
Code Appendix
The code can also be found at Here
The code for Menu.py:
#Menu Program - Main File for the Project
import filter
import os
import sys, pygame
import numpy as np
from pygame.locals import *
import time
import RPi.GPIO as GPIO
import cv2
from subprocess import call

os.putenv('SDL_VIDEODRIVER', 'fbcon')
os.putenv('SDL_FBDEV', '/dev/fb1')
os.putenv('SDL_MOUSEDRV', 'TSLIB')
os.putenv('SDL_MOUSEDEV', '/dev/input/touchscreen')

GPIO.setmode(GPIO.BCM)
GPIO.setup(27, GPIO.IN, pull_up_down=GPIO.PUD_UP)

pygame.init()

#Video capture commands
feed = cv2.VideoCapture(0)
feed.set(cv2.CAP_PROP_FRAME_WIDTH, 320)
feed.set(cv2.CAP_PROP_FRAME_HEIGHT, 240)


if (not feed.isOpened()):
	print ("Error: Can't find Pi Camera")
	quit()
else:
	print ("Success: Pi Camera is open")


surf = pygame.Surface((320,240))
irect = pygame.Rect((0,0),(240,320))

# pygame constants
size = width, height = 320, 240
BLACK = 0, 0, 0
WHITE = 255, 255, 255
font = pygame.font.Font(None, 20)

screen = pygame.display.set_mode(size)

pygame.mouse.set_visible(False)

# state constants
ORIG = 1				# original video
MENU = 2				# menu
TYPES = 3				# where you select which type
DESC = 4 				# description state for each type
SIMULATED = 5		# simulated video for each type
CORRECTED = 6		# corrected video

# type constants (values based on state TYPES)
PROTANOMALY = 31
PROTANOPIA = 32
DEUTERANOMALY = 33
DEUTERANOPIA = 34
TRITANOMALY = 35
TRITANOPIA = 36
ACHROMATOMALY = 37
MONOCHROMACY = 38

# variables
state = ORIG      # current state
prev_type = 0     # previous type of color blindness selected
curr_type = 0     # current type of color blindness selected
desc_text = ""    # text for DESC state
state_flag = 0    # 1 for simulation, 2 for correction

# need to create buttons for each state
orig_buttons = {"Menu": (50, 40)}
menu_buttons = {"Color Assistant": (width/2,50), "Color Simulation": (width/2,100), "Original": (width/2,150), "Back": (width-50,200)}
type_buttons = {"Protanomaly": (80,20), "Protanopia": (220,20), "Deuteranomaly": (80,65), "Deuteranopia": (220,65),
			"Tritanomaly": (80,110), "Tritanopia": (220,110), "Achromatomaly": (80,155), "Monochromacy": (220,155),
			"Back": (width-50,200)}
desc_buttons = {"Start": (50,200), "Back": (width-50,200)}
simulated_buttons = {"Menu": (50,40)}
corrected_buttons = {"Menu": (50,40)}

# init
screen.fill(BLACK)

for text, pos in orig_buttons.items():
	text_surface = font.render(text, True, WHITE)
	rect = text_surface.get_rect(center=pos)
	screen.blit(text_surface, rect)

pygame.display.flip()


# displays unfiltered image on screen
def show_orig_image():
	global irect
	global feed

	returnBool, frame = feed.read()

	rgbf = cv2.cvtColor(frame, cv2.COLOR_BGR2RGB)
	rgbf = cv2.rotate(rgbf, cv2.ROTATE_90_COUNTERCLOCKWISE)
	rgbf = cv2.flip(rgbf,1)
	surf = pygame.pixelcopy.make_surface(rgbf)
	screen.blit(surf, irect)

	# text = filter.middle_color(rgbf)
	# text_surface = font.render(text, True, WHITE)
	# rect = text_surface.get_rect(center=(width-40, height-20))
	# screen.blit(text_surface, rect)


# displays filtered image on screen
def show_filter_image():
	global curr_type
	global irect
	global state
	global feed

	returnBool, frame = feed.read()

	rgbf = cv2.cvtColor(frame, cv2.COLOR_BGR2RGB)
	rgbf = cv2.rotate(rgbf, cv2.ROTATE_90_COUNTERCLOCKWISE)
	rgbf = cv2.flip(rgbf,1)

	if state == SIMULATED:
	new_rgbf = filter.simulate(rgbf, curr_type)
	elif state == CORRECTED:
	if curr_type == PROTANOPIA:
		new_rgbf = filter.correct_opia(rgbf, .1)
	elif curr_type == PROTANOMALY:
		new_rgbf = filter.coldImage(rgbf)
	elif curr_type == DEUTERANOPIA:
		new_rgbf = filter.correct_opia(rgbf, .1)
	elif curr_type == DEUTERANOMALY:
		new_rgbf = filter.coldImage(rgbf)
	elif curr_type == TRITANOPIA:
		new_rgbf = filter.correct_opia(rgbf, .3)
	elif curr_type == TRITANOMALY:
		new_rgbf = filter.correct_opia(rgbf, .03)
	elif curr_type == ACHROMATOMALY:
		new_rgbf = filter.warmImage(rgbf)
	else:
		new_rgbf = rgbf
	# new_rgbf = filter.simulate(new_rgbf, curr_type)

	surf = pygame.pixelcopy.make_surface(new_rgbf)
	screen.blit(surf, irect)

	text = filter.middle_color(rgbf)
	text_surface = font.render(text, True, WHITE)
	rect = text_surface.get_rect(center=(width-40, height-20))
	screen.blit(text_surface, rect)


# handles state == ORIG
def state_orig(event):
	# check for menu button press
	# if menu button, state = MENU
	global state
	global feed

	# draw buttons
	screen.fill(BLACK)

	# show the image
	show_orig_image()

	# pygame.draw.rect(screen, WHITE, ((158, 118), (4, 4)), 2)

	for text, pos in orig_buttons.items():
	text_surface = font.render(text, True, WHITE)
	rect = text_surface.get_rect(center=pos)
	screen.blit(text_surface, rect)

	# print current state
	# text_surface = font.render("ORIGINAL", True, WHITE)
	# rect = text_surface.get_rect(center=(width/2, height/2))
	# screen.blit(text_surface, rect)

	pygame.display.flip()

	if (event is None):
	return

	if (event.type is  MOUSEBUTTONDOWN):
	pos = pygame.mouse.get_pos()
	elif (event.type is MOUSEBUTTONUP):
	pos = pygame.mouse.get_pos()
	x,y = pos
	#change states when menu button is pressed
	if x < 70:
		if y < 60:
		#Menu button is pressed
		state = MENU

		feed.release()
		# draw next state buttons
		screen.fill(BLACK)

		for text, pos in menu_buttons.items():
			text_surface = font.render(text, True, WHITE)
			rect = text_surface.get_rect(center=pos)
			screen.blit(text_surface, rect)

		pygame.display.flip()


# handles state == MENU
def state_menu(event):
	# check for correction, simulation or original button press
	# if simulation button, state_flag = 1
	# if correction button, state_flag = 2
	# state = ORIG
	global state
	global state_flag
	global feed

	# draw buttons
	screen.fill(BLACK)

	for text, pos in menu_buttons.items():
	text_surface = font.render(text, True, WHITE)
	rect = text_surface.get_rect(center=pos)
	screen.blit(text_surface, rect)

	pygame.display.flip()

	if (event is None):
	return

	if (event.type is MOUSEBUTTONDOWN):
	pos = pygame.mouse.get_pos()
	elif (event.type is MOUSEBUTTONUP):
	pos = pygame.mouse.get_pos()
	x,y = pos
	#change states when menu button is pressed
	if x > width/4 and x < 3*width/4:
		if y < 75:
		#correction
		state = TYPES

		state_flag = 2

		# draw next state buttons
		screen.fill(BLACK)
		for text, pos in type_buttons.items():
			text_surface = font.render(text, True, WHITE)
			rect = text_surface.get_rect(center=pos)
			screen.blit(text_surface, rect)

		pygame.display.flip()
		elif y < 125:
		#simulation
		state = TYPES
		state_flag = 1

		# draw next state buttons
		screen.fill(BLACK)
		for text, pos in type_buttons.items():
			text_surface = font.render(text, True, WHITE)
			rect = text_surface.get_rect(center=pos)
			screen.blit(text_surface, rect)

		pygame.display.flip()
		elif y < 175:
		#original
		state = ORIG

		feed = cv2.VideoCapture(0)
		feed.set(cv2.CAP_PROP_FRAME_WIDTH, 320)
		feed.set(cv2.CAP_PROP_FRAME_HEIGHT, 240)

		# draw next state buttons
		screen.fill(BLACK)
		for text, pos in orig_buttons.items():
			text_surface = font.render(text, True, WHITE)
			rect = text_surface.get_rect(center=pos)
			screen.blit(text_surface, rect)

		pygame.display.flip()
	elif x > 250:
		if y > 180:
		#back
		state = ORIG

		feed = cv2.VideoCapture(0)
		feed.set(cv2.CAP_PROP_FRAME_WIDTH, 320)
		feed.set(cv2.CAP_PROP_FRAME_HEIGHT, 240)

		# draw next state buttons
		screen.fill(BLACK)

		# show filtered image
		show_orig_image()

		for text, pos in orig_buttons.items():
			text_surface = font.render(text, True, WHITE)
			rect = text_surface.get_rect(center=pos)
			screen.blit(text_surface, rect)

		pygame.display.flip()


# handles state == TYPES
def state_types(event):
	# check for color blindness type button press
	# if back button, state = MENU
	# if selected type buttons, state = DESC, set curr_type

	#define the state transitions based on what button is pressed
	global state
	global curr_type
	global desc_text

	# draw buttons
	screen.fill(BLACK)

	for text, pos in type_buttons.items():
	text_surface = font.render(text, True, WHITE)
	rect = text_surface.get_rect(center=pos)
	screen.blit(text_surface, rect)

	pygame.display.flip()

	if (event is None):
	return

	if (event.type is  MOUSEBUTTONDOWN):
	pos = pygame.mouse.get_pos()
	elif (event.type is MOUSEBUTTONUP):
	pos = pygame.mouse.get_pos()
	x,y = pos
	if x < 150:
		if y < 43:
		#protanomaly
		curr_type = PROTANOMALY
		state = DESC

		elif y < 88:
		#deuteranomaly
		curr_type = DEUTERANOMALY
		state = DESC

		elif y < 133:
		#tritanomaly
		curr_type = TRITANOMALY
		state = DESC

		elif y < 178:
		#achromatomaly
		curr_type = ACHROMATOMALY
		state = DESC

	elif x > 150:
		if y < 43:
		#protanopia
		curr_type = PROTANOPIA
		state = DESC
		elif y < 88:
		#deuteranopia
		curr_type = DEUTERANOPIA
		state = DESC
		elif y < 133:
		#tritanopia
		curr_type = TRITANOPIA
		state = DESC
		elif y < 178:
		#monochromacy
		curr_type = MONOCHROMACY
		state = DESC
		elif y > 180:
		#back
		state = MENU

	if state == MENU:
	# draw next state buttons
	screen.fill(BLACK)
	for text, pos in menu_buttons.items():
		text_surface = font.render(text, True, WHITE)
		rect = text_surface.get_rect(center=pos)
		screen.blit(text_surface, rect)

	pygame.display.flip()
	elif state == DESC:
	# draw next state buttons
	screen.fill(BLACK)

	for text, pos in desc_buttons.items():
		text_surface = font.render(text, True, WHITE)
		rect = text_surface.get_rect(center=pos)
		screen.blit(text_surface, rect)

	# draw next state text, broken up into two lines
	set_desc_text()

	word_list = desc_text.split(" ")
	if (len(word_list) > 5):
		word_six = desc_text.index(word_list[5])
		text_surface = font.render(desc_text[:word_six], True, WHITE)
		rect = text_surface.get_rect(center=(width/2, height/2-10))
		screen.blit(text_surface, rect)

		text_surface = font.render(desc_text[word_six:], True, WHITE)
		rect = text_surface.get_rect(center=(width/2, height/2+10))
		screen.blit(text_surface, rect)

	else:
		text_surface = font.render(desc_text, True, WHITE)
		rect = text_surface.get_rect(center=(width/2, height/2))
		screen.blit(text_surface, rect)

	pygame.display.flip()


# handles state == DESC
def state_desc(event):
	# show desc_text
	# check for back or start button press
	# if back button, state = TYPES, set curr_type = prev_type
	# draw buttons
	global state
	global state_flag
	global feed


	set_desc_text()

	screen.fill(BLACK)

	for text, pos in desc_buttons.items():
	text_surface = font.render(text, True, WHITE)
	rect = text_surface.get_rect(center=pos)
	screen.blit(text_surface, rect)

	# draw next state text, broken up into two lines
	set_desc_text()

	word_list = desc_text.split(" ")
	if (len(word_list) > 5):
	word_six = desc_text.index(word_list[5])
	text_surface = font.render(desc_text[:word_six], True, WHITE)
	rect = text_surface.get_rect(center=(width/2, height/2-10))
	screen.blit(text_surface, rect)

	text_surface = font.render(desc_text[word_six:], True, WHITE)
	rect = text_surface.get_rect(center=(width/2, height/2+10))
	screen.blit(text_surface, rect)

	else:
	text_surface = font.render(desc_text, True, WHITE)
	rect = text_surface.get_rect(center=(width/2, height/2))
	screen.blit(text_surface, rect)

	pygame.display.flip()

	if (event is None):
	return

	if (event.type is  MOUSEBUTTONDOWN):
	pos = pygame.mouse.get_pos()
	elif (event.type is MOUSEBUTTONUP):
	pos = pygame.mouse.get_pos()
	x,y = pos
	if y > 180:
		if x > 250:
		#back
		state = TYPES
		# draw next state buttons
		screen.fill(BLACK)

		for text, pos in type_buttons.items():
			text_surface = font.render(text, True, WHITE)
			rect = text_surface.get_rect(center=pos)
			screen.blit(text_surface, rect)

		pygame.display.flip()

		elif x < 80:
		#start
		feed = cv2.VideoCapture(0)
		feed.set(cv2.CAP_PROP_FRAME_WIDTH, 320)
		feed.set(cv2.CAP_PROP_FRAME_HEIGHT, 240)

		if state_flag == 1:
			state = SIMULATED

			# draw next state buttons
			screen.fill(BLACK)

			# show filtered image
			show_filter_image()

			pygame.draw.rect(screen, WHITE, ((158, 118), (4, 4)), 2)

			for text, pos in simulated_buttons.items():
			text_surface = font.render(text, True, WHITE)
			rect = text_surface.get_rect(center=pos)
			screen.blit(text_surface, rect)

			pygame.display.flip()
		elif state_flag == 2:
			state = CORRECTED

			# draw next state buttons
			screen.fill(BLACK)

			# show filtered image
			show_filter_image()

			pygame.draw.rect(screen, WHITE, ((158, 118), (4, 4)), 2)

			for text, pos in corrected_buttons.items():
			text_surface = font.render(text, True, WHITE)
			rect = text_surface.get_rect(center=pos)
			screen.blit(text_surface, rect)

			pygame.display.flip()


# handles state == SIMULATED
def state_simulated(event):
	# check for menu button press
	# if menu button, state = MENU
	global state
	global feed

	# draw buttons
	screen.fill(BLACK)

	# show filtered image
	show_filter_image()

	pygame.draw.rect(screen, WHITE, ((158, 118), (4, 4)), 2)

	for text, pos in simulated_buttons.items():
	text_surface = font.render(text, True, WHITE)
	rect = text_surface.get_rect(center=pos)
	screen.blit(text_surface, rect)

	# print current state
	# text_surface = font.render("SIMULATED", True, WHITE)
	# rect = text_surface.get_rect(center=(width/2, height/2))
	# screen.blit(text_surface, rect)

	pygame.display.flip()

	if (event is None):
	return

	if (event.type is  MOUSEBUTTONDOWN):
	pos = pygame.mouse.get_pos()
	elif (event.type is MOUSEBUTTONUP):
	pos = pygame.mouse.get_pos()
	x,y = pos
	if x < 70:
		if y < 60:
		#menu button is pressed
		state = MENU

		# draw next state buttons
		screen.fill(BLACK)

		feed.release()

		for text, pos in menu_buttons.items():
			text_surface = font.render(text, True, WHITE)
			rect = text_surface.get_rect(center=pos)
			screen.blit(text_surface, rect)

		pygame.display.flip()


# handles state == CORRECTED
def state_corrected(event):
	# check for menu button press
	# if menu button, state = MENU
	global state
	global feed

	# draw buttons
	screen.fill(BLACK)

	# show filtered image
	show_filter_image()

	pygame.draw.rect(screen, WHITE, ((158, 118), (4, 4)), 2)

	for text, pos in corrected_buttons.items():
	text_surface = font.render(text, True, WHITE)
	rect = text_surface.get_rect(center=pos)
	screen.blit(text_surface, rect)

	# print current state
	# text_surface = font.render("CORRECTED", True, WHITE)
	# rect = text_surface.get_rect(center=(width/2, height/2))
	# screen.blit(text_surface, rect)

	pygame.display.flip()

	if (event is None):
	return

	if (event.type is  MOUSEBUTTONDOWN):
	pos = pygame.mouse.get_pos()
	elif (event.type is MOUSEBUTTONUP):
	pos = pygame.mouse.get_pos()
	x,y = pos
	if x < 70:
		if y < 60:
		state = MENU

		# draw next state buttons
		screen.fill(BLACK)

		feed.release()

		for text, pos in menu_buttons.items():
			text_surface = font.render(text, True, WHITE)
			rect = text_surface.get_rect(center=pos)
			screen.blit(text_surface, rect)

		pygame.display.flip()


# sets the text for the description based on current type selected
def set_desc_text():
	global curr_type
	global desc_text

	if curr_type == PROTANOMALY:
	desc_text = "Red look like green and colors are less bright"

	text_surface = font.render("Protanomaly", True, WHITE)
	rect = text_surface.get_rect(center=(width/2, height/4))
	screen.blit(text_surface, rect)

	elif curr_type == PROTANOPIA:
	desc_text = "No difference between red/green"

	text_surface = font.render("Protanopia", True, WHITE)
	rect = text_surface.get_rect(center=(width/2, height/4))
	screen.blit(text_surface, rect)

	elif curr_type == DEUTERANOMALY:
	desc_text = "Green look like red"

	text_surface = font.render("Deuteranomaly", True, WHITE)
	rect = text_surface.get_rect(center=(width/2, height/4))
	screen.blit(text_surface, rect)

	elif curr_type == DEUTERANOPIA:
	desc_text = "No difference between red/green"

	text_surface = font.render("Deuteranopia", True, WHITE)
	rect = text_surface.get_rect(center=(width/2, height/4))
	screen.blit(text_surface, rect)

	elif curr_type == TRITANOMALY:
	desc_text = "Hard to tell difference between blue/green and between yellow/red"

	text_surface = font.render("Tritanomaly", True, WHITE)
	rect = text_surface.get_rect(center=(width/2, height/4))
	screen.blit(text_surface, rect)

	elif curr_type == TRITANOPIA:
	desc_text = "No difference between blue/green, purple/red, yellow/pink"

	text_surface = font.render("Tritanopia", True, WHITE)
	rect = text_surface.get_rect(center=(width/2, height/4))
	screen.blit(text_surface, rect)

	elif curr_type == ACHROMATOMALY:
	desc_text = "Some deficiency in all cones"

	text_surface = font.render("Achromatomaly", True, WHITE)
	rect = text_surface.get_rect(center=(width/2, height/4))
	screen.blit(text_surface, rect)

	elif curr_type == MONOCHROMACY:
	desc_text = "No color at all and more sensitive to light"

	text_surface = font.render("Monochromacy", True, WHITE)
	rect = text_surface.get_rect(center=(width/2, height/4))
	screen.blit(text_surface, rect)

	else:
	desc_text = ""

	pygame.display.flip()


# handles the states of the system
def run(event):
	global state
	if state == ORIG:
	state_orig(event)

	elif state == MENU:
	state_menu(event)

	elif state == TYPES:
	state_types(event)

	elif state == DESC:
	state_desc(event)

	elif state == SIMULATED:
	state_simulated(event)

	elif state == CORRECTED:
	state_corrected(event)

	else:
	state = ORIG


terminate = 0
# runs program
while(1):
	time.sleep(0.05)

	# without events (clicks)
	run(None)

	for event in pygame.event.get():
	if event.type == pygame.QUIT:
		sys.exit()

	run(event)

	if not GPIO.input(27):
		terminate = 1
		break

	if not GPIO.input(27) or terminate:
	call(["clear"])
	break

GPIO.cleanup()
The code for Filter.py:
import numpy as np
import cv2
import matplotlib
# import scipy
from scipy.interpolate import UnivariateSpline

# simulation variables

# from menu.py
PROTANOMALY = 31
PROTANOPIA = 32
DEUTERANOMALY = 33
DEUTERANOPIA = 34
TRITANOMALY = 35
TRITANOPIA = 36
ACHROMATOMALY = 37
MONOCHROMACY = 38

# simulation values for each type of color blindness
sim_values = {
	str(PROTANOPIA):
		[[0.567, 0.433, 0],
		[0.558, 0.442, 0],
		[0, 0.242, 0.758]],
	str(PROTANOMALY):
		[[0.817, 0.183, 0],
		[0.333, 0.667, 0],
		[0, 0.125, 0.875]],
	str(DEUTERANOPIA):
		[[0.625, 0.375, 0],
		[0.7, 0.3, 0],
		[0, 0.3, 0.7]],
	str(DEUTERANOMALY):
		[[0.8, 0.2, 0],
		[0.258, 0.742, 0],
		[0,0.142,0.858]],
	str(TRITANOPIA):
		[[0.95, 0.05, 0],
		[0, 0.433, 0.567],
		[0, 0.475, 0.525]],
	str(TRITANOMALY):
		[[0.967, 0.033, 0],
		[0, 0.733, 0.267],
		[0, 0.183, 0.817]],
	str(MONOCHROMACY):
		[[0.299, 0.587, 0.114],
		[0.299, 0.587, 0.114],
		[0.299, 0.587, 0.114]],
	str(ACHROMATOMALY):
		[[0.618, 0.320, 0.062],
		[0.163, 0.775, 0.062],
		[0.163, 0.320, 0.516]]
}

# color rgb values
colors = [ [0, 0, 0],           # black
			[255, 255, 255],    # white
			[234, 50, 35],      # red
			[238, 133, 50],     # orange
			[254, 251, 84],     # yellow
			# [116, 246, 75],   # light green
			[54, 220, 33],      # green
			# [53, 125, 126],   # blue green
			# [125, 200, 247],  # light blue
			[94, 100, 220],     # blue
			[94, 22, 139],      # violet
			#[189, 112, 246],   # light purple
			#[233, 63, 246],    # pink
			# [115, 26, 122],   # violet
			#[116, 21, 62],     # maroon
			#[119, 66, 20]      # brown
			]

# names of colors in list colors
colors_names = ["black",
				"white",
				"red",
				"orange",
				"yellow",
				# "light green",
				"green",
				# "blue green",
				# "light blue",
				"blue",
				"violet",
				#"light purple",
				#"pink",
				# "violet",
				#"maroon",
				#"brown"
				]


def simulate(rgbf, curr_type):
	sim = sim_values[str(curr_type)]
	sim = np.array(sim)
	flat_rgbf = rgbf.reshape(1, 320*240, 3)
	flat_rgbf = flat_rgbf[0]
	flat_dot = np.einsum('ij,kj->ki', sim, flat_rgbf)
	flat_dot = flat_dot.astype(int)
	flat_dot = np.array(flat_dot)
	new_rgbf = flat_dot.reshape(320, 240, 3)
	return new_rgbf


def correct_opia(rgbf,h):
	flat_rgbf = np.array(rgbf.reshape(1,320*240,3)[0], dtype="float")
	flat_rgbf = np.divide(flat_rgbf, 255)
	HSV = matplotlib.colors.rgb_to_hsv(flat_rgbf)
	HSV[:,0]+=h
	HSV[HSV > 1] -= 1
	HSV[HSV < 0] = 0
	rgb = matplotlib.colors.hsv_to_rgb(HSV)
	new_rgb = np.multiply(rgb, 255)
	new_rgb = new_rgb.reshape(320, 240, 3).astype(int)
	return new_rgb

def correct_omaly(rgbf,s):
	flat_rgbf = np.array(rgbf.reshape(1,320*240,3)[0], dtype="float")
	flat_rgbf = np.divide(flat_rgbf, 255)
	HSV = matplotlib.colors.rgb_to_hsv(flat_rgbf)
	HSV[:,1]+=s
	HSV[HSV > 1] -= 1
	HSV[HSV < 0] = 0
	rgb = matplotlib.colors.hsv_to_rgb(HSV)
	new_rgb = np.multiply(rgb, 255)
	new_rgb = new_rgb.reshape(320, 240, 3).astype(int)
	return new_rgb


def middle_color(rgbf):
	global colors_names

	ax, ay, az = rgbf.shape
	center = rgbf[int(ax/2)-1:int(ax/2)+1, int(ay/2)-1:int(ay/2)+1]
	center = cv2.cvtColor(center, cv2.COLOR_RGB2RGBA)

	new_avg = np.empty((2,2,3))

	new_avg[:,:,0] = center[:,:,0]
	new_avg[:,:,1] = center[:,:,1]
	new_avg[:,:,2] = center[:,:,2]

	new_avg = new_avg.reshape(1,4,3)[0]

	avg = new_avg.sum(axis=0)//4

	x1 = colors
	x3 = np.subtract(x1, avg)
	x4 = np.abs(x3)
	x4 = x4.sum(axis=1)
	index = np.argmin(x4)
	return colors_names[index]


def spreadLookupTable(x, y):
	spline = UnivariateSpline(x, y)
	return spline(range(256))


def coldImage(image):
	increaseLookupTable = spreadLookupTable([0, 64, 128, 256], [0, 80, 160, 256])
	decreaseLookupTable = spreadLookupTable([0, 64, 128, 256], [0, 50, 100, 256])
	red_channel, green_channel, blue_channel = cv2.split(image)
	red_channel = cv2.LUT(red_channel, decreaseLookupTable).astype(np.uint8)
	blue_channel = cv2.LUT(blue_channel, increaseLookupTable).astype(np.uint8)
	return cv2.merge((red_channel, green_channel, blue_channel))


def warmImage(image):
	increaseLookupTable = spreadLookupTable([0, 64, 128, 256], [0, 80, 160, 256])
	decreaseLookupTable = spreadLookupTable([0, 64, 128, 256], [0, 50, 100, 256])
	red_channel, green_channel, blue_channel = cv2.split(image)
	red_channel = cv2.LUT(red_channel, increaseLookupTable).astype(np.uint8)
	blue_channel = cv2.LUT(blue_channel, decreaseLookupTable).astype(np.uint8)
	return cv2.merge((red_channel, green_channel, blue_channel))